
Interlocking Cardboard Castle DIY
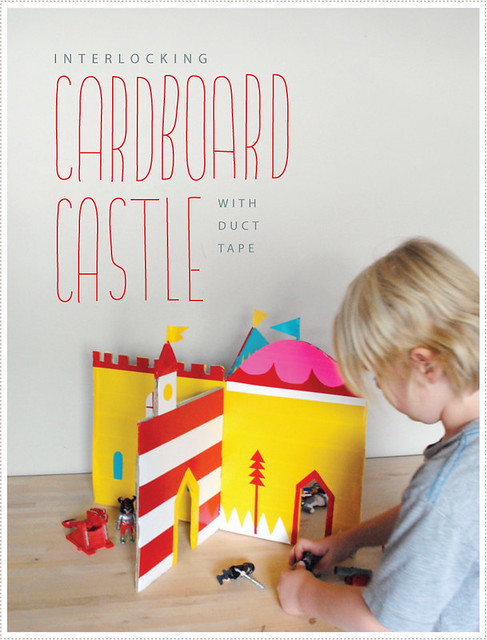 OK friends, I've finally got everything together to share with you our latest cardboard + duct tape creative adventure (which is the perfect weekend project for you and your Littles). Presenting...our Interlocking Cardboard Play Castle! We are having SO much fun with this, you wouldn't even believe it. In fact I think I've found just thing to get me more engaged and on the floor playing with my Littles in their world. I'm not usually one to sit down and "play" with my kids. I typically help to facilitate their play and then let them go at it. But with this castle...well I've been down on my hands and knees playing castle right alongside them (and I forgot how fun delving into accents can be..).
 Well I have to confess, I got a little obsessed with this one. It was SO much fun to make.
Once I finally figured out how to cut and handle duct tape, well I couldn't wait to try my hand at something a little more involved.
Well I have to confess, I got a little obsessed with this one. It was SO much fun to make.
Once I finally figured out how to cut and handle duct tape, well I couldn't wait to try my hand at something a little more involved.
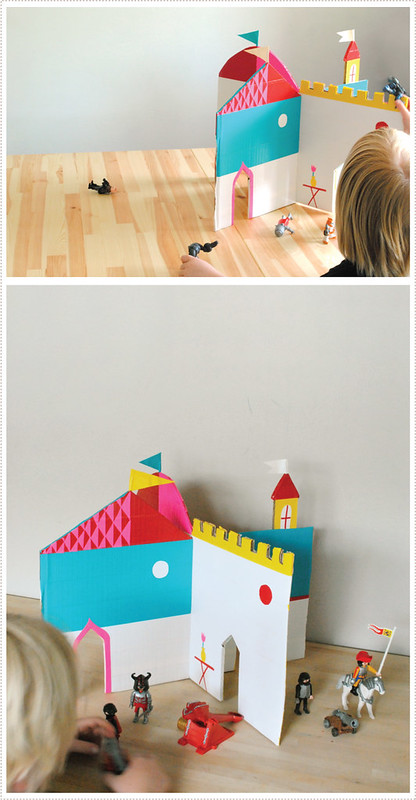
To begin, I used sturdy cardboard (taken from an old Baby Lock sewing machine box) to cut out the basic interlocking shapes of my castle. I decided to go with a 10"x10" squares for each portion of each wall (so a 20" long sheet of board all together) and then added a mix of castle-like rooftop structures up top.
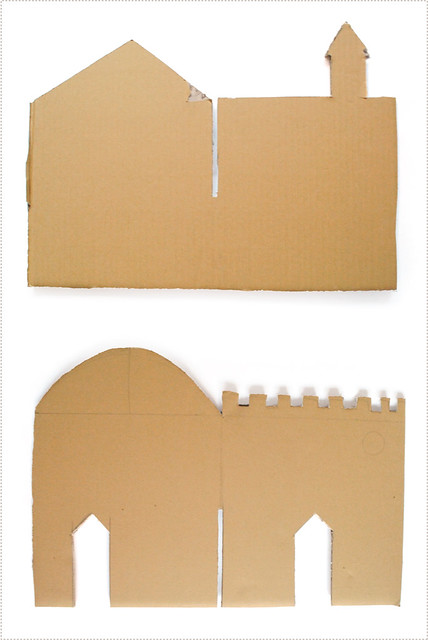 I then cut out door frames from each wall, making sure they were large enough for the Littles play things (namely Playmobil characters) to fit in and out of.
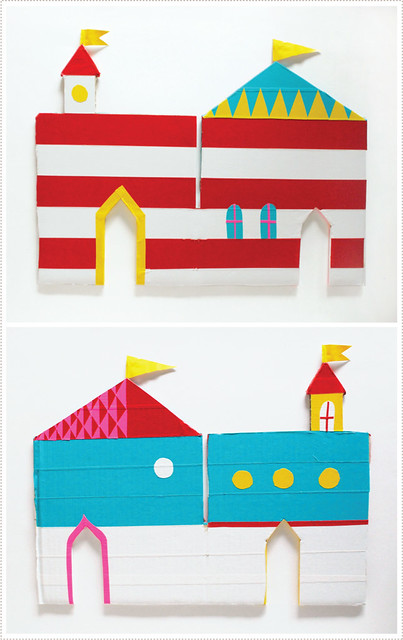
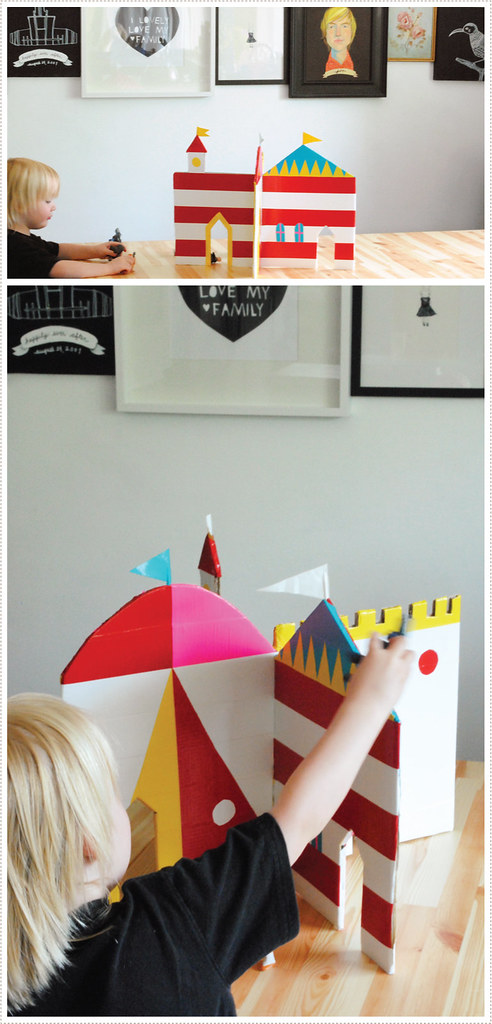
And now comes the fun part...decorating the castle walls with brightly colored duct tape! (I should get them to sponsor these posts, don't you think? I mean I'm only singing their praises like, every other minute...:)) The only hard part in decorating the castle was deciding on what to leave out, as there are so many directions you could take this.
 In the end I decided to keep it fun and graphic and not too specific as
to what you would do in what room (but you could always go more literal by having more
obvious interior and exterior rooms, etc. for yours if you like).
In the end I decided to keep it fun and graphic and not too specific as
to what you would do in what room (but you could always go more literal by having more
obvious interior and exterior rooms, etc. for yours if you like). 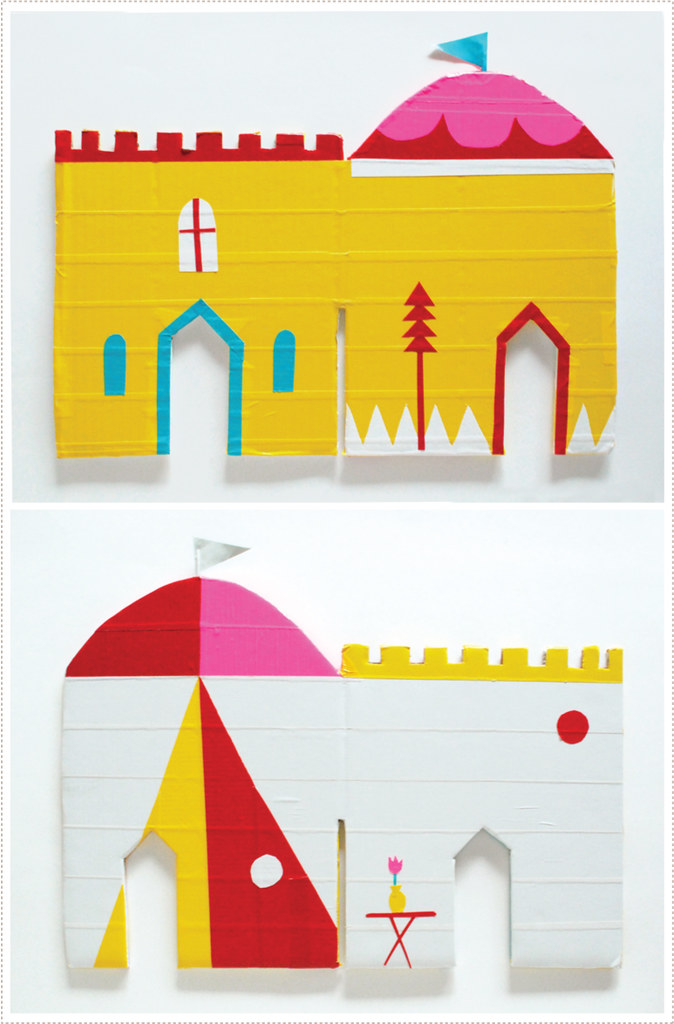 I did add a few small elements to some "rooms" such as a tree to suggest the outdoors and small table with a tulip for an indoor room (hey, even strong warriors need a calm place of respite after a long journey or a fierce battle, right?). I also added flags to some of the rooftops by simply wrapping duct tape around a tooth pick and then cutting it down to the desired shape. From there I just pushed the tooth pick into the top of the cardboard (I might however decide to hot glue them in later for greater permanence).
If you want to have your Littles help with this process, adding the
details/decals is a great way to do it. Just be sure that you are doing the cutting and then you can hand the decal over to them and have them
place it on (and depending on their age you might want to help them with this. A would get really frustrated whenever an item folded over onto itself and he couldn't take it apart). You can also bring them in on the design process. They'll love letting you know just what they have in mind for their castle.
And if you are interested in creating an interlocking castle yourself, and want to follow the basic shape of mine, I have created some templates for you to use. Just print them out and use them as patterns to trace onto your thick cardboard (or foam core works really well too).
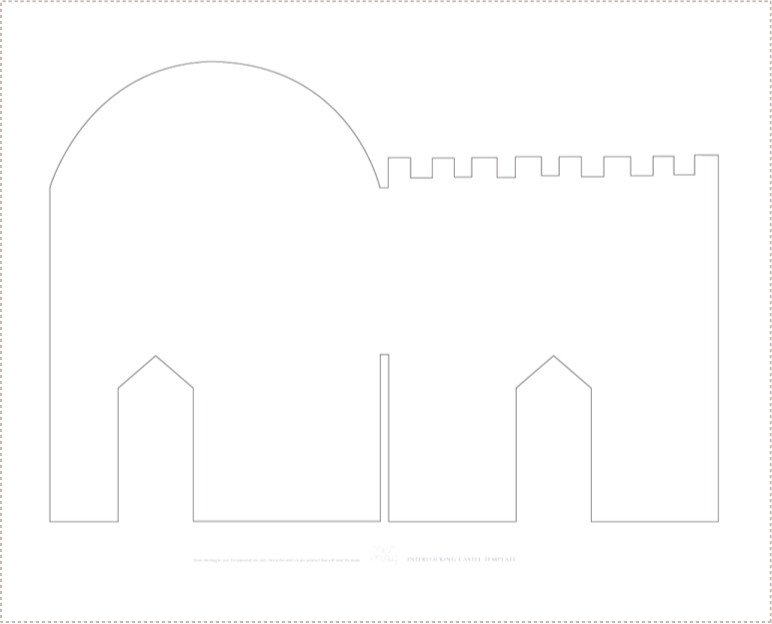
 These templates are created as an 18"x24" document so that you can print them in their entirety. I would suggest saving the files out to a thumb drive and then taking them to your local copy store and have them print them on large sheets of paper there. Click on the pictures above to download each section of the castle.
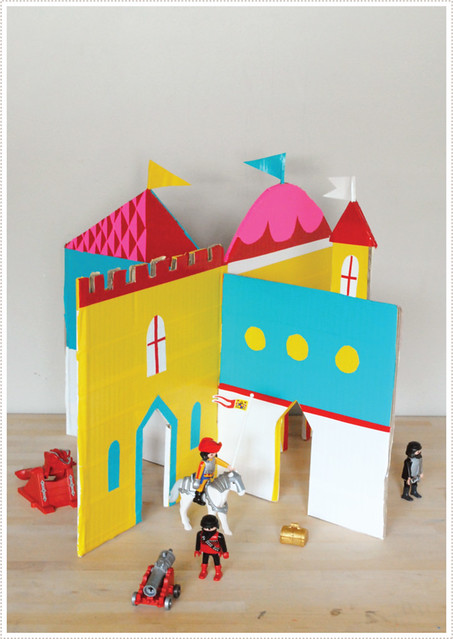 Now that you are done decorating your castle, it's time to assemble it by lining up the center notches and pushing the top one down (be careful not to un-stick all of your duct tape "siding" in this process. I might suggest scoring the duct tape a bit where the two boards interlock so that this doesn't happen). Now it's time to gather together your little ones toys and figurines and let the play begin! Oh and you can invite the Littles to join you if you so wish.
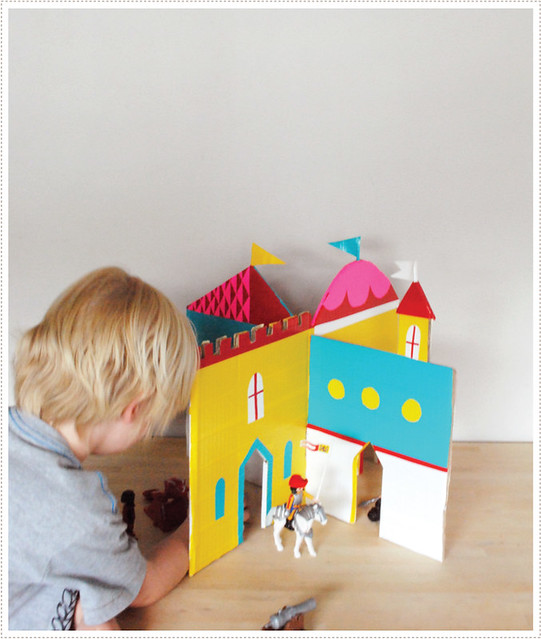
 And what fun you will all have exploring all your many rooms! (which can actually change by the way, depending on how you assemble the boards together at different times).
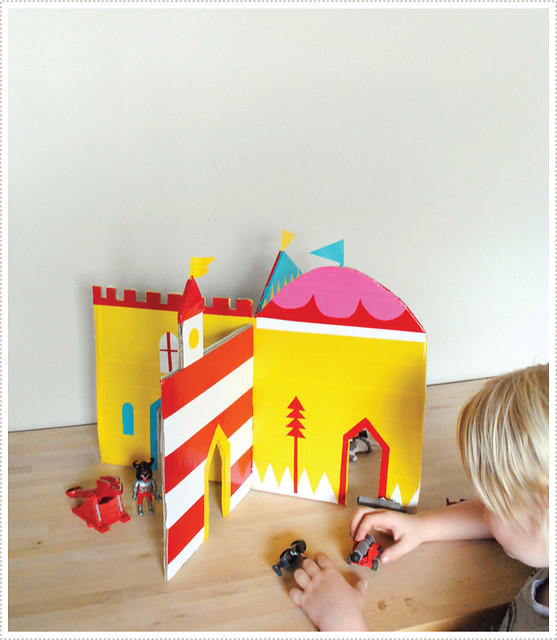
 I also love just how portable and rather study this little castle is (that's the great thing about duct tape, it's sort of indestructible). Just bring it over to the kitchen table while your making dinner and your Littles will be entertained for a good long while.
 And if you make one of these, I really really would LOVE to see what you do with it. I'm just so excited about the many possibilities for this little castle and I have a feeling that your touch is just what it needs to take it to the next level of magic. So don't forget to email me and share!
Happy Weekend Friends! I'm off tomorrow to hear A perform his songs he's been practicing for Kindergarten graduation. I'm pretty sure it's bound to be just about the most adorable thing ever. And then next week we have a field day, a Teddy Bear picnic and more. Oh how I love the last few days of school and the beginning of summer!


This is freaking awesome! I wish I had kids just so I could make this and play with it myself lol.
ReplyDeleteLily you should totally make it anyway. I have been having so much fun with it. perhaps more fun than my boys even. :)
Deletexo
mer
I am awestruck mixed with a little envy. You are awesome. THIS is awesome.
ReplyDeleteJenn you are too kind. I'm awestruck by everything that you do!
Deletexo
mer
This is wonderful!! I hope you will visit us at Sharing Saturday and share this with us this week!
ReplyDeleteOooh, I love this. Every single thing about it. Thank you so much for sharing!
ReplyDeleteThis is so great. We've made castles before out of cardboard but theyv've been the single fronted variety. This four-way version in WAY more playable. It's on the list! Thanks
ReplyDeletecutest thing you have ever done!
ReplyDeleteWow love this so would my nearly 5yr old son, I'm thinking thin MDF as a birthday pressie... Must go and make....right now
ReplyDeleteOh my! That is just fantastic. Can't wait to give it a try.
ReplyDeleteloving the castle Merrilee! AND the teaching kids work + to love design post! <- I wish more parents would get on that bandwagon. There is nothing more frustrated than seeing kids help around the house and yard... instead, they are getting drunk in bars! This video really is just for kicks: http://www.youtube.com/watch?v=cds7lSHawAw
ReplyDeletelove it! Roxy you crack me up.
Deletexo
mer
Pinning this with every intention of constructing one myself...it will be a while. My boys are just 4 months and 17 months ;) I LOVE this! Hats off to you; great imagination.
ReplyDeletetotally saw this on pintrest today! So I came to read the post. ;)
ReplyDeleteHi I discovered your blog today and I find it great! thank you for this tutorial
ReplyDeletenice day
I love this idea. And I'm glad I'm not the only thinking of making one for myself as well as the kids! Mine would have a corner cafe, a bookstore, a flower shop, and a patisserie. :-)
ReplyDeleteThanks for sharing this.
just amazing and fun!!! I love the colors and the idea!! Thank you very much for this tutorial!! :-)
ReplyDeleteThanks for this amazing idea. But is it possible that the download of the template contains only one castle????
ReplyDeleteKindest regards
rosa & limone
Hi! Thanks for bringing that to my attention. It should be fixed now and both files should download in a zip format. Let me know if you still have trouble.
Deletethanks!
mer
How fab is this! Amazing. Thank you! And congrats on your expected baby girl! So fantastic. But I've just come across you on Pinterest so now I'm going to have to follow you! Looks like lots of fun stuff here.
ReplyDelete:D
You are such a fantastically creative person! This is a great idea! My daughter in ten and a duct tape fiend, I think she would love to try this herself. Thank you for sharing! AWESOME.
ReplyDeleteAwesome idea. Thanks for sharing
ReplyDeleteWow awesome!Excellent piece of work very impressive.I love your creative work keep it up.. Website Template
ReplyDeleteThis is fantastic. I have the perfect slab of cardboard under my kid's bed!
ReplyDeleteBut I'm having problems downloading the file. Is it still available?
Hi there, the link seems to be broken. Is this still available?
ReplyDeleteHi Mike, they should be working now. Just click on the template images and it should take you to the download page. Thanks!
Deletemer
soooo cute and beautiful!!
ReplyDeleteExcellent idea!
ReplyDeleteLove it! We love making out own toys at home
ReplyDeleteSo awesome. Love that it's made from cardboard and duct tape.
ReplyDeleteLove this! Thanks for sharing! I needed something to keep the kids happy in the holidays so I'm adding this to the ideas list
ReplyDeleteSo stinkin' cute! Mommy would have a blast creating and decorating, Boy would have a blast stormin' the castle! :-) If you haven't already, you should share your idea on the Duck Tape facebook page, which by pure coincidence I happened to have just liked myself! https://www.facebook.com/ducktape?fref=ts
ReplyDeletegreat job!
-jill at http://thingswithwingsartjournal.blogspot.com
Have been really inspired by your castle so have spent the weekend creating one with my 6 year old duct tape the best, although we just used silver as I wasn't fully prepped! Still looks pretty good-thanks for the ideas!
ReplyDelete